DIY butter from heavy cream powder
Want to hear something that sounds about as believable as my teenager cleaning their room without being asked? You can make fresh butter from powder. No, I’m not talking about waving a magic wand over your coffee creamer – though wouldn’t that be nice? I’m talking about real, honest-to-goodness butter that you can spread on your bread, melt over your vegetables, or hide in the back of the fridge with a label that says “Leftover Brussels Sprouts” so nobody else uses it.
But before we dive into this dairy-transforming miracle, let’s clear up the biggest misconception since “zombie apocalypse weapons don’t need maintenance.” This isn’t about those non-dairy coffee creamers that have ingredients you can’t pronounce. Those won’t work because they’re mostly corn syrup and vegetable oils – about as close to real cream as a fruit roll-up is to garden-fresh strawberries.
Here’s where the science gets as picky as a food critic at a fast-food restaurant. You’ll encounter three main types of cream powder, and choosing the right one is crucial unless you enjoy exercising your arms for no reason:
Heavy Cream Powder (Your butter-making bestie):
- Contains 72% butterfat in powder form
- Reconstitutes to about 40% butterfat when mixed with water
- Will reliably form butter
- Often labeled as “Heavy Whipping Cream Powder”
- This is your guy. Accept no substitutes
Note: Be sure to experiment first so that you know you like the taste of the cream/butter.
Regular Whipping Cream Powder (The underachiever):
- Contains about 65% butterfat in powder form
- Reconstitutes to about 30-35% butterfat
- May whip well but won’t reliably form butter
- Usually labeled as “Whipping Cream Powder”
- Like that friend who says they’ll help you move but develops a mysterious back problem that day
Coffee Whitener/Non-Dairy Creamer (The impostor):
- Contains no real butterfat
- Made from corn syrup solids and vegetable oils
- Cannot form butter under any circumstances
- Often labeled as “Coffee Creamer” or “Non-Dairy Creamer”
- About as useful for making butter as a chocolate teapot
For this kitchen alchemy to work, you need genuine heavy cream powder (Anthony’s is a reliable brand, but there are others). Think of it as cream playing hide-and-seek – just waiting for you to add water and coax it back into dairy perfection.
Now, let’s talk process. First comes reconstitution, and this is where patience matters more than during a toddler’s bedtime routine. Mix one cup of cream powder with seven-eighths cup of ICE COLD water. When I say ice cold, I mean cold enough to make a polar bear reach for a sweater. The temperature isn’t just a suggestion – it’s as crucial as coffee on a Monday morning.
Whisk until smooth, then pop it in the refrigerator for two hours. Yes, two whole hours. No, you can’t speed this up. I’ve tried. The laws of thermodynamics are apparently immune to puppy dog eyes and begging.

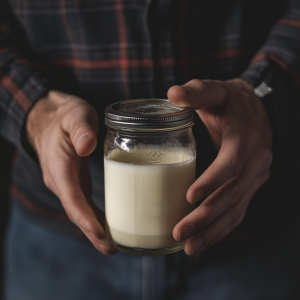
Shake the jar vigorously to make your own butter
Here comes the fun part – or as I like to call it, “Who Needs a Gym Membership Anyway?” Pour your cold mixture into a mason jar, filling it only about one-third full. This space is important because what you’re about to do requires room for movement, like a teenager’s dance moves. Secure the lid tightly, and start shaking. Congratulations! You’re now your own butter churn, just like great-great-grandma, but with fewer petticoats.
For the next 5-10 minutes, you’ll be getting a free arm workout. You’ll feel the mixture thicken, and the sound will change from sloshing to a muffled thud. Keep going. When the shaking gets quieter, you’re getting close. Suddenly, you’ll feel something solid form – that’s your butter separating from the buttermilk. It’s like kitchen chemistry in action, minus the safety goggles and singed eyebrows.
This next part is crucial, like checking if there’s toilet paper before sitting down. Pour off the buttermilk (save it for biscuits – your taste buds will write you a thank-you note), and rinse your butter with cold water until the water runs clear. Skip this step, and your butter will turn rancid faster than a teenager’s mood swing. Work the butter with a spoon or paddle under running water, fold and press it to remove all the liquid. If you like salted butter, now’s the time to work in about a quarter teaspoon of salt per cup of butter.
Now, let’s talk storage, because this is where your inner prepper gets to do a happy dance that would embarrass your children. Heavy cream powder has an impressive shelf life that would make those little yeast packets weep with envy. When properly stored, we’re talking 5-10 years in the original sealed container if kept in a cool, dark place below 70°F. But wait, it gets better – store it in #10 cans with oxygen absorbers, and you’re looking at 15+ years of butter-making potential. That’s longer than most marriages in Hollywood!
Temperature is pickier than a toddler at dinnertime when it comes to storage: keep it between 55-70°F, with humidity lower than 15%. Your finished butter will keep like any fresh butter – about a week at room temperature if properly salted, or several weeks in the refrigerator if you can resist eating it all immediately (good luck with that).

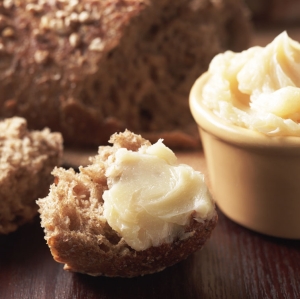
Homemade butter
For those wondering about yield (aka “how much do I need to shake to justify that slice of fresh bread?”), expect about half a cup of butter and half a cup of buttermilk from each cup of cream powder. This is important for calculating your storage needs, unless you’re like me and subscribe to the “more is more” philosophy when it comes to butter storage.
If things aren’t working out perfectly on your first try, don’t panic. It’s probably temperature-related, like most of life’s problems. If your butter isn’t forming, the mixture is probably warmer than a cat’s favorite sunspot. Pop it back in the fridge and try again when it’s colder. If your finished butter is too soft, use colder water for rinsing and chill between rinses. And if your butter turns rancid quickly, you probably didn’t rinse enough – keep washing until that water runs clearer than your teenager’s explanation of why they missed curfew.
What makes this method particularly valuable for preppers is its versatility. While it works beautifully with power (using a mixer speeds things up considerably), you can make butter this way completely off-grid. No electricity required – just arm power and enough patience to make a saint look fidgety.
For those new to this method, I strongly recommend practicing now, while you have the luxury of experimentation. Make small batches, test different temperatures, try both hand-shaking and electric mixing methods. Get comfortable with the process before you need to rely on it. Remember, skills trump supplies every time in a real emergency, unless those supplies are chocolate. Chocolate always wins.
One final tip: while this method is fantastic for long-term storage solutions, don’t overlook the practical everyday applications. Having shelf-stable cream powder on hand means you’re never more than a few hours away from fresh butter, even if you forgot to pick some up at the store. It’s preparedness meeting practicality, and those are often the best solutions of all – like pockets in women’s clothing or pizza delivery.
Be sure to stock up on some amazing recipes specifically designed to use both your homemade butter and that leftover buttermilk. Because in the preparedness community, we don’t waste anything – especially not delicious buttermilk that’s perfect for biscuits, pancakes, and all those other foods that make your cardiologist nervously update their contact information.
Remember: Life is short. Make the butter. Eat the bread. And maybe do a few extra arm exercises to balance it all out.


